Integrations
Supported integration areas
Energy SOAR supports integration with external systems used for alert ingestion, communication handling, response automation, identity services and threat intelligence enrichment.
The platform supports integrations across security and operations platforms, email and mail security environments, endpoint protection solutions, directory and identity services, and external threat intelligence and knowledge sources. Energy SOAR also includes its own threat intelligence source in the form of Energy Security Feed.
The complete list of supported integrations is available in the sections below:
Analyzersfor enrichment, intelligence lookups and external knowledge sourcesRespondersfor operational and response actions in integrated systems
Energy Logserver SIEM
This integration send alerts from Energy Logserver SIEM to Energy SOAR. It is a standard example of SIEM-to-SOAR alert ingestion supported by the platform.
Create API key
Create new (non-admin) user and generate API key.

Click Reveal

Copy the API key

Edit Alert
On Energy Logserver add configuration in the Alert service config.
# vi /opt/alert/config.yaml
hive_connection:
   hive_host: https://<Energy_SOAR_IP>/base
   hive_apikey: <api_key>
Restart the Alert service
# systemctl restart alert
Alert rule configuration
Configure details in the alert rule configuration
alert: hivealerter
hive_alert_config_type: classic
hive_alert_config:
  type: "AUDIT"
  source: "SIEM"
  severity: 2
  tags: ["ELS","audit"]
  tlp: 3
  status: "New"
  follow: True
hive_observable_data_mapping:
 - ip: "{match[src_ip]}"
   message: "Source IP address"
   tags: ["src: SIEM"]
 - domain: "{match[username]}"
   message: "Audit username"
   tags: ["src: SIEM"]
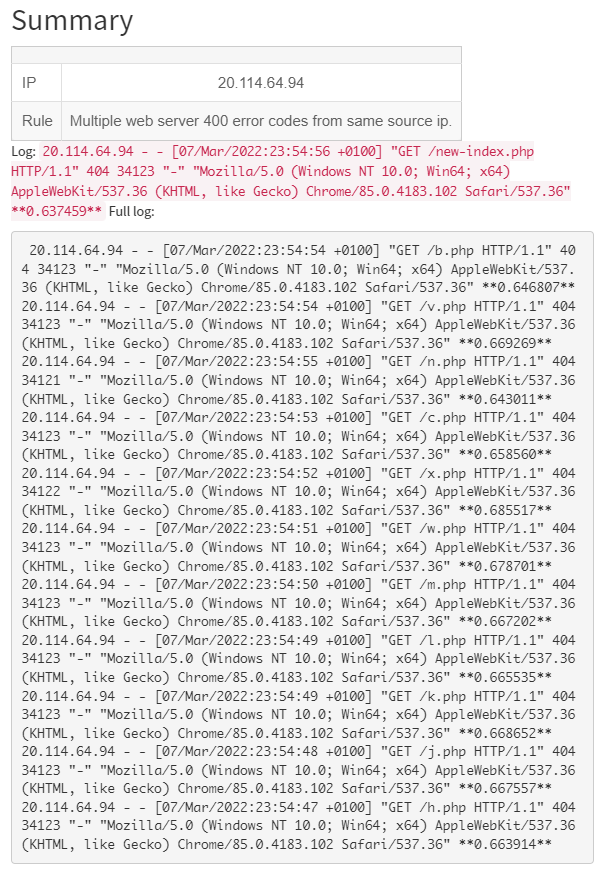
Custom message
By default Energy Logserver SIEM send a json with all alert fields. You can customize your message using markdown.
For example:
alert_text: "## Summary\r\n
\r\n\r\n
|  |  |\r\n
|---|---|\r\n
| IP | {} |\r\n
| Rule | {} |\r\n
\r\n\r\n
Log: `{}`\r\n
Full log: \r\n
```\r\n
{}\r\n
```\r\n
"
alert_text_args:
  - data.srcip
  - rule.description
  - full_log
  - previous_output
Preview:
Microsoft Exchange
Installation
Download the Exchange integration.
# curl -u'license user:license pwd' \
-O https://repo.energysoar.com/add-ons/synapse.tar.gz
Unpack and install the dependencies.
# tar -zxvf synapse.tar.gz -C /opt
# dnf install -y python3-devel gcc
# /usr/bin/python3 -m pip install -r /opt/synapse/requirements.txt
Install the system service.
# cp "/opt/synapse/synapse@.service" /usr/lib/systemd/system/
Info: The service allows you to run multiple instances. Create a synapse user.
# adduser -r -s /bin/nologin -d /opt/synapse --system synapse
Change permissions.
# chown -R synapse: /opt/synapse
Instance configuration
# mv /opt/synapse/conf/synapse.conf \
/opt/synapse/conf/synapse.conf.example

# cp /opt/synapse/conf/synapse.conf.example \
/opt/synapse/conf/exchange.conf
Enter the file /opt/synapse/conf/exchange.conf and make the following changes.
Set the API key and user in Energy SOAR Base section.
user:
api_key:
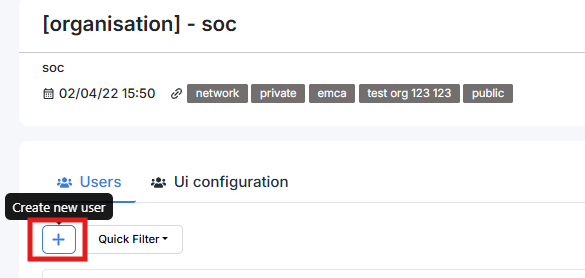
To do this, create a new technical account. Log in as an admin or soc-admin to the Energy SOAR system. In the case of an admin, click on the organization in which you want to create the user. Then create a new local user.
Login: synapse@energysoar.local
Full name: Synapse
Profile: analyst
If the user already exists, you can create an API key by clicking on the following button.
Then to copy the key, you need to open it by clicking the Reveal button.

In the EWS section, provide data for the technical account from which we will read emails.
username:
password:
auth_type:NTLM
smtp_address:
folder_name:Inbox
Inbox is the main folder to which all emails are usually sent. If the integration is to read emails from another catalog, you should specify it here. In the [Instance] section, change the name from synapse to exchange.
Start the instance
# systemctl enable --now synapse@exchange